个人服务器(Personal Server)部署
Edited by Ben. Turn to ContentPage
Get the knowledge flowing and circulating! :)
目录
在个人电脑(PC)上安装虚拟机(VM Ware),然后安装并配置深度学习需要的环境:
Anaconda 3
PyTorch
Jupyter Notebook
个人服务器(Personal Server)部署安装Anaconda 3(Ubuntu系统)1 软件下载2 软件安装3 软件使用 - Anaconda 3新建虚拟环境在新的虚拟环境下安装PyTorch(CPU only)安装并配置Jupyter Notebook(在虚拟环境中安装的)Jupyter Notebook 安装 & 配置Jupyter Notebook的使用新建另一个环境并且放入jupyter notebook页面的新建按钮中测试参考网页
安装Anaconda 3(Ubuntu系统)
1 软件下载
下载地址:Anaconda 3 → 64-Bit (x86) Installer (1015.6 MB)
2 软件安装
在Windows系统上下载好Anaconda 3(
.sh文件),复制到Ubuntu系统中; (地址栏→文本:快捷键为Ctrl + L)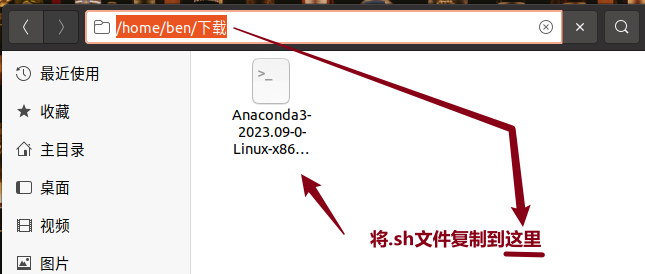
在终端找到并打开
.sh文件;查看当前文件夹下的文件,命令:
ls转anaconda3安装包目录下,命令:
cd 下载安装anaconda3,命令:
bash Anaconda3-xxx.sh
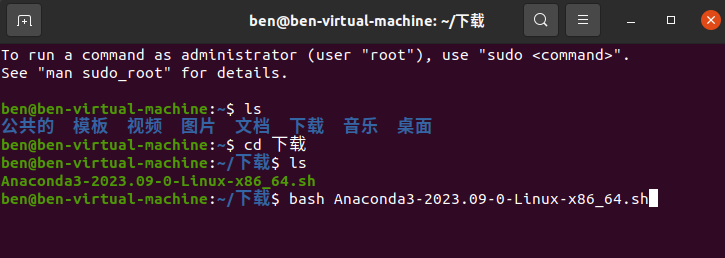
不断敲击回车:查看软件协议,直到最后,要输入
yes表示同意,即可继续安装;xxxxxxxxxx21Do you accept the license terms? [yes|no]2[no] >>> yes※然后提示安装Anaconda3的位置,这里非常重要,要注意看看是不是在
root文件夹下,如果不是(比如,这里是在用户文件夹下),则可以直接点击Enter键继续安装;xxxxxxxxxx81Anaconda3 will now be installed into this location:2/home/ben/anaconda334- Press ENTER to confirm the location5- Press CTRL-C to abort the installation6- Or specify a different location below78[/home/ben/anaconda3] >>>安装完成;但是提醒了一堆不太明白的东西,先记录下来:直接回车,结束安装。
xxxxxxxxxx381[/home/ben/anaconda3] >>>2PREFIX=/home/ben/anaconda33Unpacking payload ...45Installing base environment...678Downloading and Extracting Packages91011Downloading and Extracting Packages1213Preparing transaction: done14Executing transaction: |1516Installed package of scikit-learn can be accelerated using scikit-learn-intelex.17More details are available here: https://intel.github.io/scikit-learn-intelex1819For example:2021$ conda install scikit-learn-intelex22$ python -m sklearnex my_application.py23242526done27installation finished.28Do you wish to update your shell profile to automatically initialize conda?29This will activate conda on startup and change the command prompt when activated.30If you'd prefer that conda's base environment not be activated on startup,31run the following command when conda is activated:3233conda config --set auto_activate_base false3435You can undo this by running `conda init --reverse $SHELL`? [yes|no]36[no] >>>3738
配置
.bashrc文件(下面的两个命令:先是修改 → 然后让修改生效)vim ~/.bashrc在最后一行添加字符串:
export PATH="/home/xxx/anaconda3/bin:$PATH"[注意,如果安装目录在root下,就要把
/home/xxx改为/root]
source ~/.bashrc【
vim的命令操作,键盘‘i’表示“insert”,进入可编辑状态】【
vim的命令操作,键盘‘esc’表示切换状态,这个时候输入命令“:wq”即可保存已编辑的文件】
查看conda版本 & conda命令的使用
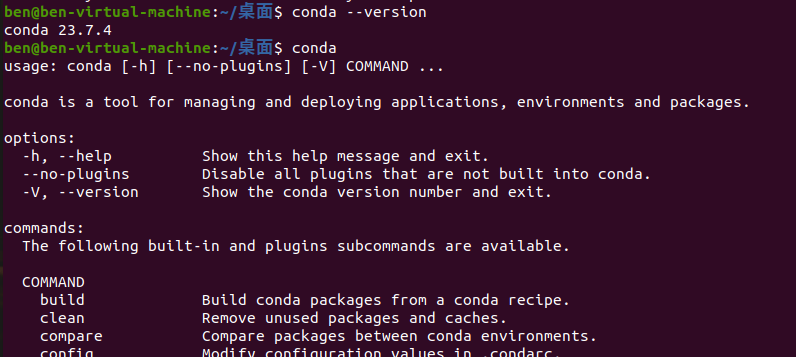
3 软件使用 - Anaconda 3
新建虚拟环境
新的env创建方法:
用如下命令创建一个配有python 3.6,最新
numpy和scipy的新环境:xxxxxxxxxx11conda create -n pytorchenv python=3.6 numpy scipy建立成功之后提示如下:
xxxxxxxxxx71# To activate this environment, use2#3# $ conda activate pytorchenv4#5# To deactivate an active environment, use6#7# $ conda deactivate环境之间的互相切换:
【环境切换 > 进入环境的命令】创建好之后,从
base进入pytorchenv:source activate pytorchenv
【环境切换 < 退出环境的命令】执行结束后,返回最初环境:
conda deactivate
查看新建的环境的版本
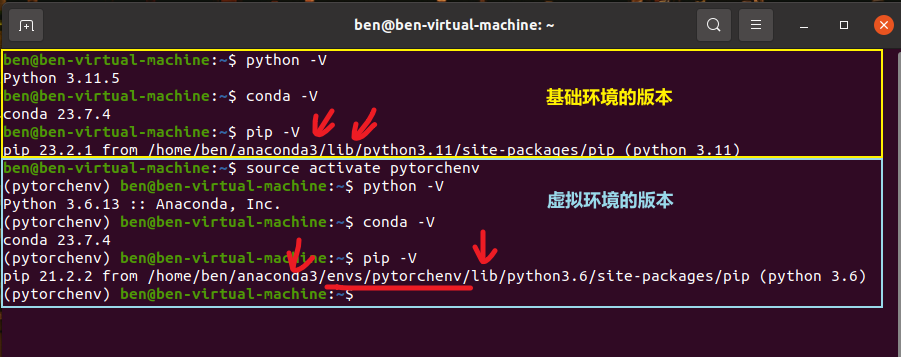
在新的虚拟环境下安装PyTorch(CPU only)
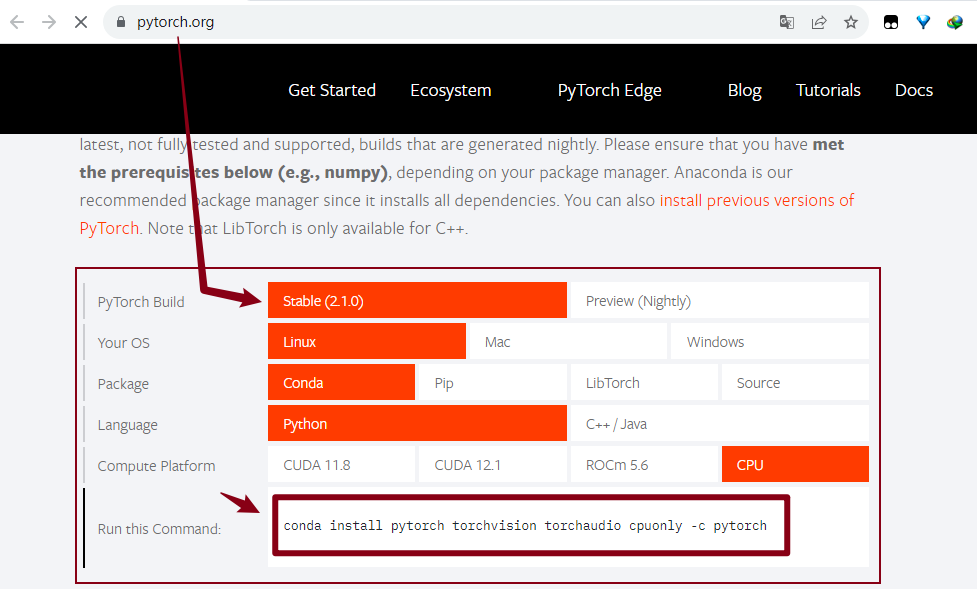
根据pytorch官网https://pytorch.org 指示,安装
CPUonly版本pytorch,命令如下:xxxxxxxxxx11conda install pytorch torchvision torchaudio cpuonly -c pytorch
测试PyTorch:打印版本查看是否正确安装
xxxxxxxxxx91ben@ben-virtual-machine:~$ source activate pytorchenv2(pytorchenv) ben@ben-virtual-machine:~$ python3Python 3.6.13 |Anaconda, Inc.| (default, Jun 4 2021, 14:25:59)4[GCC 7.5.0] on linux5Type "help", "copyright", "credits" or "license" for more information.6>>> import torch7>>> print(torch.__version__)81.10.29>>>
安装并配置Jupyter Notebook(在虚拟环境中安装的)
Jupyter Notebook 安装 & 配置
首先激活环境,在虚拟环境下安装,这样不会对大环境造成影响,如果失败了,就把这个环境x掉,重新建一个,再尝试!
xxxxxxxxxx31ben@ben-virtual-machine:~$ source activate pytorchenv23(pytorchenv) ben@ben-virtual-machine:~$ conda install jupyter
生成密码并保存密码(后面要用)
x
1(pytorchenv) ben@ben-virtual-machine:~$ jupyter notebook --generate-config2Writing default config to: /home/ben/.jupyter/jupyter_notebook_config.py3(pytorchenv) ben@ben-virtual-machine:~$ python4Python 3.6.13 |Anaconda, Inc.| (default, Jun 4 2021, 14:25:59)5[GCC 7.5.0] on linux6Type "help", "copyright", "credits" or "license" for more information.7>>> from notebook.auth import passwd8>>> passwd()9Enter password:10Verify password:11'argon........................................w'12>>> exit()这里的第9行 & 第10行,我点按“Enter”
直接回车,表示不输入密码。修改配置文件
xxxxxxxxxx11vim ~/.jupyter/jupyter_notebook_config.py对文件做以下修改,端口号可以根据自己电脑情况设置,不冲突就行。
注意这几行的注释需要打开。(vim的查找快捷键是 ‘/’+查找内容)
xxxxxxxxxx51c.NotebookApp.allow_remote_access = True2c.NotebookApp.open_browser = False # 禁止notebook启动时自动打开浏览器(在linux服务器一般都是ssh命令行访问,没有图形界面的。所以,启动也没啥用) 此项极为重要3c.NotebookApp.ip = '*' # 设置访问notebook的ip,表示所有IP,这里设置ip为都可访问4c.NotebookApp.port = 8889 # 指定访问的端口,默认是8888。5c.NotebookApp.password = 'sha1:xxxxx' # 填写刚刚生成的密文配置完成
Jupyter Notebook的使用
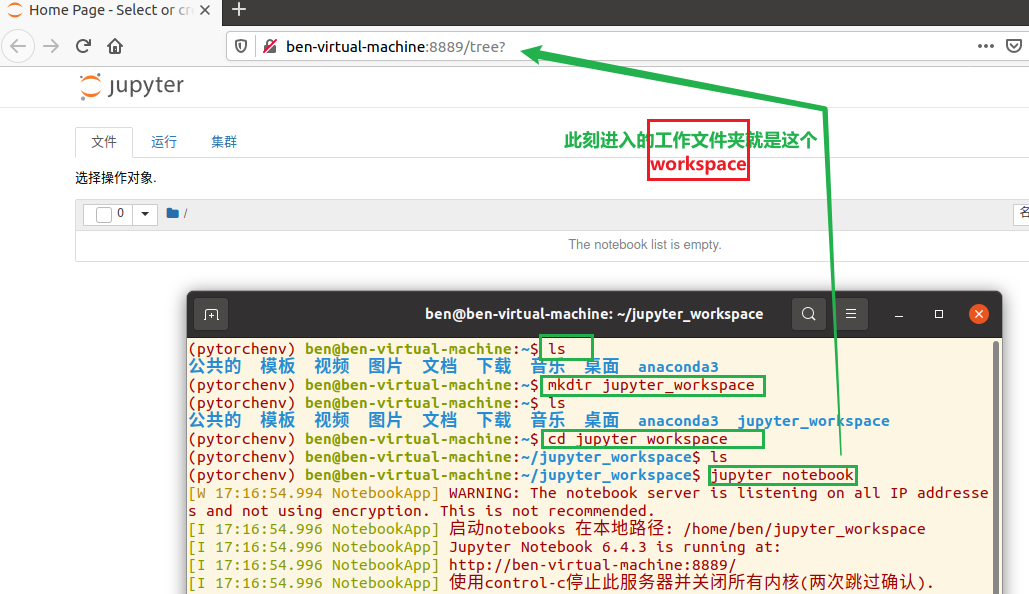
打开新终端,输入
jupyter notebook,触发以下信息xxxxxxxxxx61(pytorchenv) ben@ben-virtual-machine:~$ jupyter notebook2[W 17:07:26.952 NotebookApp] WARNING: The notebook server is listening on all IP addresses and not using encryption. This is not recommended.3[I 17:07:26.954 NotebookApp] 启动notebooks 在本地路径: /home/ben4[I 17:07:26.954 NotebookApp] Jupyter Notebook 6.4.3 is running at:5[I 17:07:26.954 NotebookApp] http://ben-virtual-machine:8889/6[I 17:07:26.954 NotebookApp] 使用control-c停止此服务器并关闭所有内核(两次跳过确认).
点击其中的类似第5行展示的链接,即可在【虚拟机 or 本地主机】浏览器中访问
jupyter notebook;此时,出现输入密码,这里直接回车即可(因为我在上述第2步——生成密文部分,直接点按“Enter”,没有输入密码)。
这里进入jupyter notebook的步骤可以总结如下:
在服务器终端输入jupyter notebook;
打开本地浏览器,输入http://localhost:portnum/; (这个时候,进入的是服务器根目录,注意选择合适的文件夹操作,不要误删其他重要文件/文件夹)
操作实例(My)
多做一步(检查)
在新建的虚拟环境中,键入命令,查看ipython, jupyter, python,可以发现都是在已新建的环境下进行的安装,对base状态下的python无影响!
xxxxxxxxxx61(pytorchenv) ben@ben-virtual-machine:~$ which python2/home/ben/anaconda3/envs/pytorchenv/bin/python3(pytorchenv) ben@ben-virtual-machine:~$ which ipython4/home/ben/anaconda3/envs/pytorchenv/bin/ipython5(pytorchenv) ben@ben-virtual-machine:~$ which jupyter6/home/ben/anaconda3/envs/pytorchenv/bin/jupyter
新建另一个环境并且放入jupyter notebook页面的新建按钮中
重新进入最基本的环境,然后新建环境,例如:
py38xxxxxxxxxx11conda deactivatexxxxxxxxxx211ben@ben-virtual-machine:~/jupyter_workspace$ conda env list2# conda environments:3#4base /home/ben/anaconda35pytorchenv /home/ben/anaconda3/envs/pytorchenv67ben@ben-virtual-machine:~/jupyter_workspace$ cd ..8ben@ben-virtual-machine:~$ conda create -n py38 python=3.8.59...10Preparing transaction: done11Verifying transaction: done12Executing transaction: done13...14ben@ben-virtual-machine:~$ conda env list15# conda environments:16#17base /home/ben/anaconda318py38 /home/ben/anaconda3/envs/py3819pytorchenv /home/ben/anaconda3/envs/pytorchenv2021ben@ben-virtual-machine:~$
激活新环境 & 安装
ipykernel安装命令(2选1):
conda install ipykernel
conda install -c anaconda ipykernel
xxxxxxxxxx81ben@ben-virtual-machine:~$ source activate py382(py38) ben@ben-virtual-machine:~$ conda install ipykernel3...4Downloading and Extracting Packages5Preparing transaction: done6Verifying transaction: done7Executing transaction: done8(py38) ben@ben-virtual-machine:~$生成
ipykernel的配置文件执行命令:
python -m ipykernel install --user --name 环境名称 --display-name "显示的环境名称"其中:
环境名称 就是我们建的新环境的名,这里是:
py38
显示环境名称 就是我们希望在jupyter notebook的新建按钮中出现的名称,这里我们假设是:
python38
那么,经过适配我们当前情况的命令就是:
python -m ipykernel install --user --name py38 --display-name "python38"xxxxxxxxxx111(py38) ben@ben-virtual-machine:~$ python -m ipykernel install --user --name py38 --display-name "python38"2Installed kernelspec py38 in /home/ben/.local/share/jupyter/kernels/py383(py38) ben@ben-virtual-machine:~$ conda deactivate4ben@ben-virtual-machine:~$ source activate pytorchenv5(pytorchenv) ben@ben-virtual-machine:~$ jupyter notebook6...7启动notebooks 在本地路径: /home/ben8[I 17:51:45.053 NotebookApp] Jupyter Notebook 6.4.3 is running at:9[I 17:51:45.053 NotebookApp] http://ben-virtual-machine:8889/10[I 17:51:45.053 NotebookApp] 使用control-c停止此服务器并关闭所有内核(两次跳过确认).11小注意:
上述代码的第3行,退出了py38环境,进入了我们安装了jupyter notebook的环境。
上述代码的第2行(后面是路径),对应显示在新建按钮中的名称
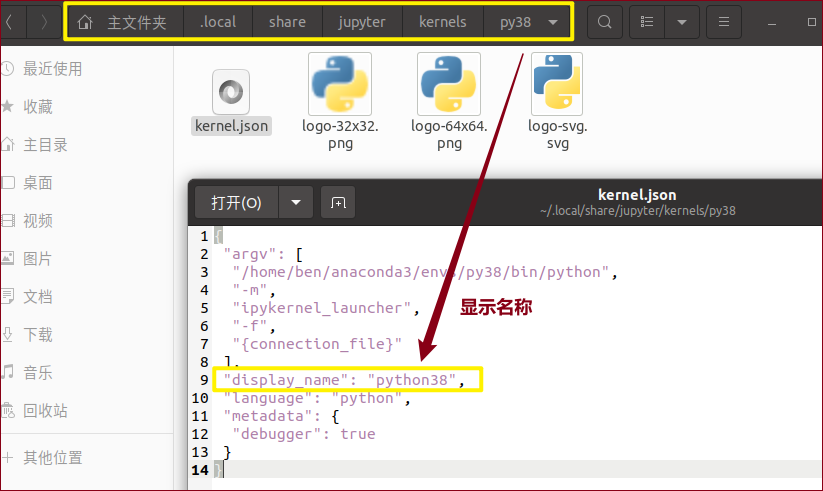
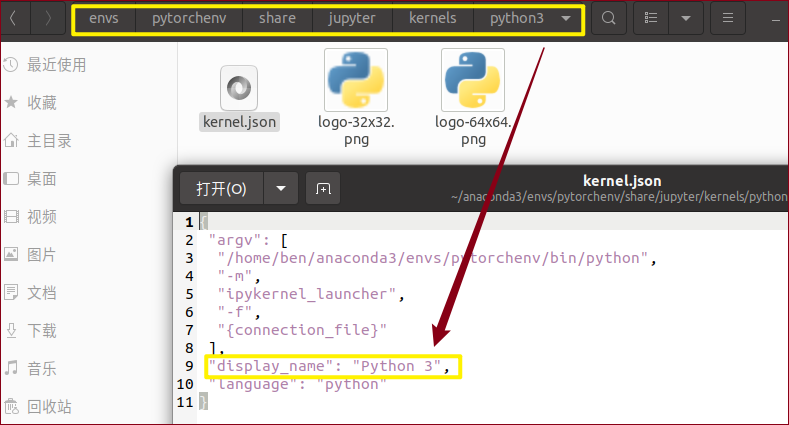
另一个虚拟环境的对应位置也可以找到~
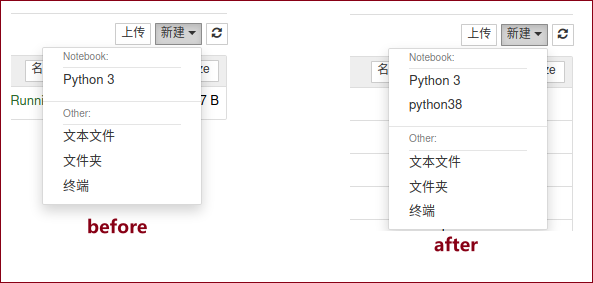
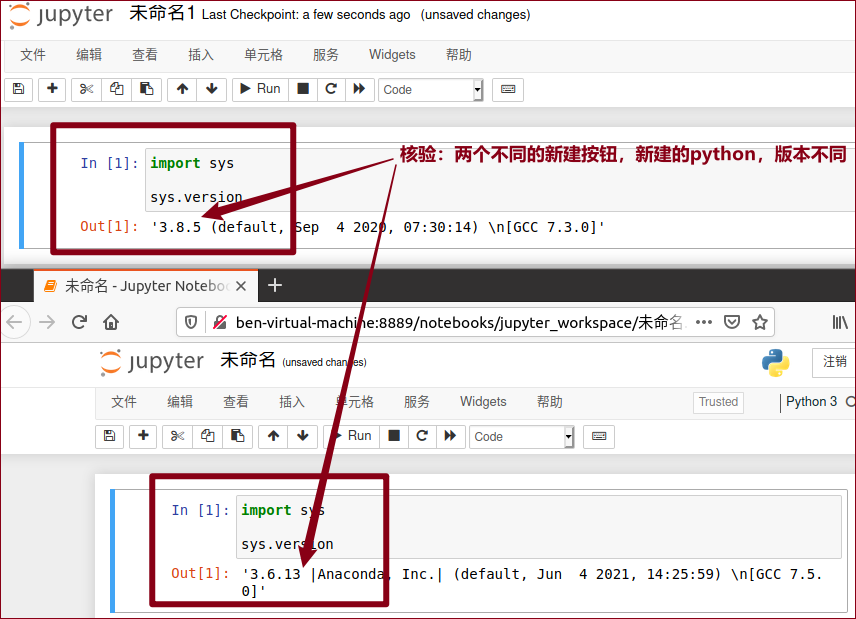
测试
xxxxxxxxxx31# 在jupyter notebook中输入2import torch3print(torch.__version__)
参考网页
问题:如何添加新环境到jupyter notebook – new中? 解答:参考文档